Tuesday, January 03, 2012

Baked apricot brie wheel w/puff pastry


photo taken with Samsung Galaxy S II X

How was everyone's holidays?! Mine was so nice, I spent it with the hubby's family. I made Christmas dinner, I had a whole menu planned out and this was one of the apps I served. It was awesome, everyone loved it. Even the old Italians who are stuck in their ways enjoyed it. Joe's mom liked it so much she had me make it again for new years dinner.

So here it is, let me know if you use it and if you do any sort of your own variation.

Ingredients

• 1 (200g) wheel Brie cheese
• 3 tablespoons apricot preserves
• 1/2 (17.5 ounce) package frozen puff pastry, thawed
• 1 egg yolk
• 1 tsp water

Directions

1. Preheat oven to 350 degrees F (175 degrees C). Lightly grease a cookie sheet.
2. Mix the egg yolk and water in a small cup; make sure it’s big enough to dip a pastry brush (silicone or otherwise) inside it. Set aside the egg wash.
3. Slice one wheel of Brie cheese in half (leave in freezer for half an hour for easier cutting) so you have 2 circles of cheese. Spread apricot on (the cut side) half of one circle of brie. Make sandwich out of the two halves of Brie, so that the preserves are in the center of both halves.
4. Wrap the entire wheel of Brie with one sheet of puffed pastry; using the egg wash to seal the folds, flip it over onto the prepared cooking sheet so the seam is on bottom. Brush the entire puff pastry with the egg wash.
5. Bake for 25 minutes, or until the pastry in golden brown. Serve immediately.

Notes:

• You can use essentially anything you want in place of the jam. I’ve tried herb and garlic cream cheese, it was just as yummy.
• I don’t use all the pastry (the half package) I find it gets too heavy/thick on the bottom otherwise. So what I do (see photos) is I use the “leftover” pastry to make shapes that I place on top of the finished product. You follow all the steps, but after you brush the pastry with egg wash place the designs on top and then egg wash it all again for a nice seal.
• Make sure you unthaw the pastry covered overnight in the fridge. Having it sit in the open (fridge, counter etc.) air makes the outside layer of the pastry hard and crusty. It’s still good but it leaves odd looking chunks you can see, even once baked.
• Every oven’s different, be sure to keep an eye on this. I’ve had mishaps where the entire wheel of cheese leaked out onto the pan.

photo taken with Samsung Galaxy S II X

Monday, December 19, 2011

Chocolate Truffle cupcakes w/Candy Cane Crackle buttercream


taken with Samsung Galaxy S II X camera


I know! 3 months since my last post. I haven't been very active in the kitchen, I've been to sick. Its been a very boring couple of months. Anyhow, I made these beauties for a group of friends and everyone fell in love! Including myself ^^ So the cupcake recipe is the same as I used for the ice cream cake. It's already become my favorite cake recipe, it's so moist and it tastes heavenly. I'll re-post the cake recipe, I made it the same way minus the peppermint extract and added almond extract. Why? well I added the extract to the buttercream and I think if the cake had it, it may have been over kill. And I know I mentioned this before, but I LOVE almonds and their taste.

So here it is, let me know if you tried it and any variations you might have :)

Cake Ingredients

• 3/4 cup hot brewed coffee
• 1 1/2 ounces semisweet chocolate, chopped
• 1 1/2 cups sugar
• 1 1/4 cups all purpose flour
• 3/4 cup regular cocoa powder (not Dutch pressed)
• 1 teaspoon baking soda
• 1/2 teaspoon baking powder
• 1/2 teaspoon fine salt
• 1 large egg
• 1 large egg white
• 6 tablespoons vegetable oil
• 3/4 cup buttermilk
• 1 teaspoon vanilla extract
• 1 teaspoon almond extract

Yields (at minimum) 24 cupcakes
original recipe courtesy of Anna Olsen

Directions

1. Preheat oven to 350 degrees F. and add paper liners to your muffin/cupcake pan. Pour freshly brewed coffee over chocolate and gently stir to melt. Set aside.

2. Sift sugar, flour, cocoa, baking soda, baking powder and salt and set aside. In a large bowl, beat eggs on high speed for 1 minute.

3. While beating, slowly add oil, buttermilk and extracts. Alternate adding flour mixture and chocolate mixture and beat until combined.

4. Pour batter into prepared paper liners (half way mark for each), bake for 25 min or until a tester inserted in the centre of the cake comes out clean. Allow cake to cool for 15 minutes in the pan, then remove to cool completely.


taken with Samsung Galaxy S II X camera


I found this recipe online (can't remember where) But I've been using this forever! And everyone loves it. This isn't the original, I've made my own tweaks over the years. Enjoy!

Candy Cane Crackle buttercream icing

Ingredients

• 16 tablespoons butter (2 sticks), at room temperature
• ½ cup peppermint candy (about 8 large peppermint sticks), finely crushed
• 5 cups confectioners' sugar, sifted
• 4 to 6 tablespoons milk
• 1 teaspoon peppermint extract

Yields (at minimum) enough for 24 cupcakes

Directions

1. Place the butter in a large mixing bowl. Blend with an electric mixer on low speed until fluffy, 30 seconds. Stop the machine and add the peppermint candy, confectioners' sugar, 4 tablespoons milk and 1 teaspoon peppermint extract.

2. Blend with the mixer on low speed until the sugar is well incorporated, 1 minute. Increase the speed to medium and beat until the frosting lightens and is fluffy, 1 minute more. Blend up to 1 tablespoon milk or peppermint extract if the frosting seems to stiff.


To finish it all off, I microwaved and drizzled an ounce of the semi-sweet chocolate on top of the buttercream. It's of course optional, but it gives it that extra pretty look and taste :)

Wednesday, September 21, 2011

Homemade Ice Cream Cake

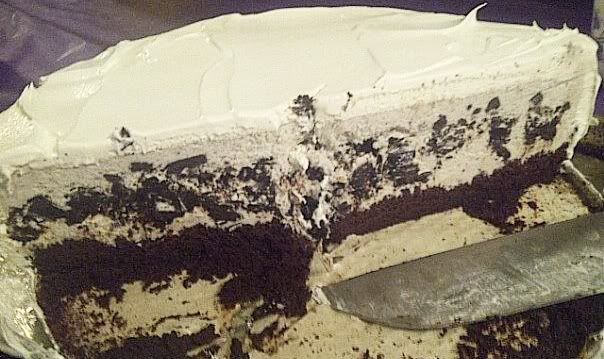
Oreo Peppermint Ice Cream Cake


So my hubbys birthday party was nice. We had close family come over to his parents and we ordered chinese! The place by his parents is heavenly, I love there stuff (and I'm picky) Anyhow my cake turned out so perfectly. It was really yummy, the only thing I would have changed was the ice cream flavor.

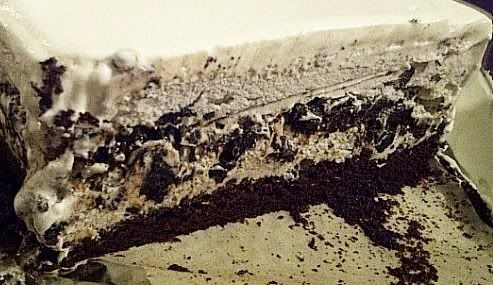
I picked up Chapmans cookies and cream flavor, it spread well and hardened up great but I hadn't realized how sweet the flavor is. I love Chapmans, they're still the only company I know of that sells 2L tubs still. But I'll def go with another flavor next time. Originally I was just going to stick with Vanilla but then I wanted the Oreo layer and figured I'd go with the cookies and cream ice cream instead.

super yummy


As for the "crust" I opted for a cake base. You can go with a cookie base instead (saves time and money) for example. But I have to say, the cake was amazing! This is one luxurious cake, everyone should try it at some point in time. Either in this recipe or by itself. I plan on making peanut butter cupcakes with this recipe later on. You can always take away or add different extracts, the peppermint was very good! Mind you we all love peppermint.

Also I must apologize for the poor pictures! I used my blackberry and it was hectic in the kitchen, plus terrible lighting = shaky not so great pictures hah

super yummy


NOTE: I'd suggest starting this a day or two before you intend on eating to make sure you have enough time between freezer time

Ingredients & tools

• 2 litres of cookies & cream ice cream (or any flavor you'd like)
• 1 package of oreos
• 2 cups of ice cream topping of choice (I used chocolate fudge)
• 10” inch springform pan
• 1 tub of ready made whipped cream

Cake

this is a recipe courtesy of Anna Olson

• 3/4 cup hot brewed coffee
• 1 1/2 ounces semisweet chocolate, chopped
• 1 1/2 cups sugar
• 1 1/4 cups all purpose flour
• 3/4 cup regular cocoa powder (not Dutch pressed)
• 1 teaspoon baking soda
• 1/2 teaspoon baking powder
• 1/2 teaspoon fine salt
• 1 large egg
• 1 large egg white
• 6 tablespoons vegetable oil
• 3/4 cup buttermilk
• 1 teaspoon vanilla
• 1 teaspoon peppermint extract

Directions

Cake

1. Preheat oven to 300 degrees F. and grease and line a 10-inch springform pan with parchment, then grease paper.
2. Pour freshly brewed coffee over chocolate and gently stir to melt. Set aside.
3. Sift sugar, flour, cocoa, baking soda, baking powder and salt and set aside. In a large bowl, beat eggs on high speed for 1 minute.
4. While beating, slowly add oil, buttermilk and extracts. Alternate adding flour mixture and chocolate mixture and beat until combined.
5. Pour batter into prepared pan and bake for 1 hour to 1 hour and 10 minutes, until a tester inserted in the centre of the cake comes out clean. Allow cake to cool for 20 minutes in the pan, then remove to cool completely.
6. Completely cooled, cut the cake horizontally and remove the top of the cake (to level the top off)
7. Place the cake back into the 10" inch springform pan and place it in the freezer for 2-3 hours

Adding the Ice Cream

1. Take the ice cream and separate it into two equal parts. Place each part into two separate bowls. Put one bowl back into the freezer for later. Let one bowl unthaw for 2-3 hours; enough for it to be spreadable but not completely unthawed and soup like.
2. Once the ice cream's ready to go, take the cake out of the freezer and evenly spread the ice cream on top of the cake for your first layer
3. Place the cake back into the freezer for 3 hours, to allow it to re-harden. Take out the second bowl of ice cream and allow it to unthaw on the counter
4. While you wait, crush the oreos. Place oreos in a plastic bag and crush them with a rolling pin. Make sure not to crush to much in one area as you'll poke a hole in the bag.
5. Take the crushed oreos and put them in a bowl; mix the ice cream topping with them and make sure it's evenly coated to your liking
6. When the ice cream has hardened, add the oreo mixture and spread it evenly on top the ice cream layer. Place the cake back in the freezer for half an hour
7. By now the second bowl of ice cream should be unthawed. Spread it on top of the oreo mixture evenly and place it back in the freezer for 2-3 hours to re-harden. Now's the time to take out and unthaw the whipped cream
8. Once hardened, take a warm towel and place it around the springform pan to help separate it from the base
9. Take the whipped cream and evenly coat the top and bottom of the cake. When finished, you can add whatever you like!
10. Place the cake back into the freezer for about a half hour. After this it should be ready to cut and enjoy

I suggest leaving the cake out 15 min before you cut it. It's also a good idea to have a large glass with hot water to soak your knife; this will make cutting the cake easier.

super yummy

Wednesday, September 07, 2011

Birthday Sneak Peak

Hey guys! So, on the 13th it's my hubby's birthday. I already gave him his gifts, he had wanted Batman Arkham Asylum. We couldn't find it anywhere in store so I ended up ordering it on ebay. Needless to say, he loves it and I like that his playing on my account gets trophies for me hah I also picked up 4 new tops and a pair of jeans for him from Old Navy. I purchased it a couple of weeks ago when they had 25% off your entire purchase. It was only $61 with taxes, how cool is that?! I very much enjoy saving money hah yes, like a crazy person.

Anyway, we were joking around last week about what he wanted me to make and the topic of an ice cream cake came up. At first, honestly, I was kinda ehh about it. But having some time to think about it, I've warmed up to the idea! I'm actually pretty excited about it now. I've never made one before so you know...be nice when I post pictures hah. I'm going to do a chocolate mint cake with a layer of vanilla ice cream and hopefully a layer of Oreo cookies (chunked up) coated in chocolate syrup. Both me and the hubby LOVE mint ice cream; but not so much everyone else. At least not to the extent that we love it, so adding the mint to the cake will be a nice alternative. The Oreo layer was really just inspiration from DQ. Oh my goodness, you have no idea how much I adore DQ cones hah

So now you're probably asking, why not get a DQ cake? I don't know about you guys but those are some expensive cakes! Besides, all my love and "awesome" go into what I'm making hah So I'm going to go and pick up a springform pan or two this weekend. That's one item I have yet to collect for the new house anyway. I'm curious though, has anyone else attempted making their own? I'd love to hear how it came out.

Wednesday, August 24, 2011

birthday festivities

I know! I've been absent...I've been scolded by certain people for it. I've been pretty busy and just overall, other life things happening.

My birthday went over so well. I'm so glad that everyone came. As I said before, it was a stache bash! Everyone loved the theme; I took the time to make signs and props for it. Lots of time and sweat went into those hah I made a happy birthday banner...not sure how I managed it but somehow while hot gluing letters I placed them sideways and upside down hah it was a messed up banner. I swear it was all right when I placed it, shame on me hah.

got the idea off of etsy

got the idea off of etsy


I got these fantastic buttons from Buttons and Badges on etsy for the "can't say a certain word all night" game. That was fun, especially as we were all drinking and not all in the right mindset hah.

got the idea off of etsy

I made cookies as well, they were sooo good! Originally it was a recipe for White Chocolate Chip Macadamia Nut cookies. I couldn't manage to get my hands on macadamia nuts so I substituted for cashews. It yielded a lot of cookies, in an around 4 dozen. I could have ate them all! I would have gained quite a bit but they were irresistible hah. Here's the recipe, I urge everyone to try it ;)

White Chocolate Chip Macadamia Nut Cookies


super yummy ^^


Makes 4 dozen

Ingredients
• 1 cup butter, softened
• 3/4 cup packed light brown sugar
• 1/2 cup white sugar
• 2 eggs
• 1/2 teaspoon vanilla extract
• 1/2 teaspoon almond extract
• 2 1/2 cups all-purpose flour
• 1 teaspoon baking soda
• 1/2 teaspoon salt
• 1 cup coarsely chopped macadamia nuts (in this case cashews worked really well)
• 1 cup coarsely chopped white chocolate

Directions
1. Preheat oven to 350 degrees F (175 degrees C).
2. In a large bowl, cream together the butter, brown sugar, and white sugar until smooth. Beat in the eggs, one at a time, then stir in the vanilla and almond extracts. Combine the flour, baking soda, and salt; gradually stir into the creamed mixture. Mix in the macadamia nuts and white chocolate. Drop dough by teaspoonfuls onto ungreased cookie sheets.
3. Bake for 10 minutes in the preheated oven, or until golden brown.
 
back to top